How to Write a Story for Children in 14 Steps
Where do I even start? That’s the overwhelming thought that comes across most aspiring children’s writers when they want to write their own book. It doesn’t matter if you want to write a picture book or a novel – the problem is always the same. The goal of this article is to teach beginners how to write a story for kids, from having a simple idea to publishing your complete story. Let’s get started on writing your first children’s story.
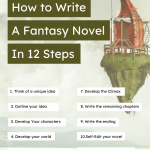
Interested in fantasy stories? You might find our guide on how to write a fantasy novel useful.
Planning Your Story
Before you even begin writing your story, you need to plan out all the important elements. Carry on reading for our amazing tips on how to plan your story.
Brainstorm your ideas
Inspiration is everywhere, you just need to know how to find it. Sometimes it takes a short walk or a moment to yourself to find inspiration. Other times you could be talking to your friends or just watching TV when inspiration strikes.
Wherever you find inspiration it is important to keep a note of this moment. We really recommend getting into the habit of carrying a notebook and pen with you wherever you go. This way you won’t forget all those amazing ideas that pop up in your head. You can even call it your ideas book! There is no right or wrong way of structuring your ideas book, but if you need help you could try the following:
- Write a list of words you find funny or interesting
- Draw or describe different characters
- Stick newspaper or magazine headlines you find interesting
- Stick any photos or images you find interesting
- Make note of any dreams you had and remember
Another great idea could be to carry a camera with you when you’re out on a walk or on a day trip and take snaps of anything interesting. Photo or image prompts are brilliant for inspiring the imagination and reminding you of past memories. We recommend you read this post on how to use image prompts to see how you can use your old photos as a source of inspiration.
Photos along with your notebook are the perfect source of inspiration for when you’re ready to sit down and start planning your next story.
Develop your ideas
Now that you have a book full of ideas, the next part is to pick one or combine a couple of ideas to focus on. Then you can start developing your ideas into brilliant stories.
We all know that every story has a beginning, middle and end. In fact, the most basic structure you might notice in stories is that you have a hero who sets off on an adventure. They face a couple of challenges on the way, overcome them and live happily ever after (of course it’s not always a happy ending for some). Knowing this basic structure we can develop our ideas further using the story jigsaw method:

Each piece of the puzzle is explained below:
- Who: Who is your character?
- Want: What does your character want?
- Why not: Why can’t your character get what they want?
This sounds simple enough! Let’s take a look at an example:
Jimmy the fox wanted to enter the spelling bee, but could not find the money to pay for books.
In the above example, Jimmy the fox is the who. His want is to “enter the spelling bee“ and the why not is that he does not have enough money to pay for books. Our simple puzzle of 3 pieces has created a plot for a possible story. However, to make an even more interesting story, you may add several other pieces, such as another who, want and why not. This is explained in more detail in our free story writing pack.
The advanced writer might be interested in adding plot twists to their story to surprise the reader. This could be a surprise ending or a new character entering your story mid-way through and so on.
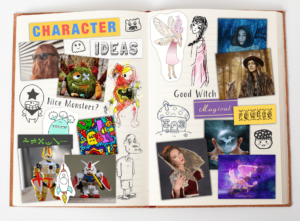
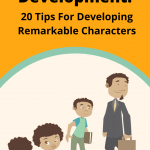
Develop your characters
Hopefully, by now you should have a clear story idea to work on. The next part is to think carefully about the characters you want to include in your story. Characters are one of the most important elements of a story.
Don’t over-complicate this step by including too many characters. We suggest choosing one or two main characters to focus on in your story. When developing your character/s, you might want to think about the following in detail:
- What do they want?
- What are they scared of?
- What bad memories do they have?
- What good memories do they have?
- Have they always been good/bad?
- What are their strengths?
- What are their weaknesses?
- What do they look like? Any unique features?
But why would anyone want to know all these little details about your character? Well… they don’t. You just need to make your characters relatable to your readers. And what makes a character relatable, you ask?
Relatable characters have traits (or features) that an everyday person can understand and believe in. Even if you’re writing a fantasy story about witches and wizards. Your characters may have magical powers, but they could also be kind, come from a poor family, have a bad experience with bullies and so on. These extra pieces of information about a character’s backstory make your character interesting to your readers.
Oh and there’s one more very important thing you need to know about the main characters in stories. And that is…they always change in some way. Your character can start off as someone who is weak and scared of everything. Then by the end, they would overcome their greatest fear and become someone who is brave. This is what makes your story really interesting!
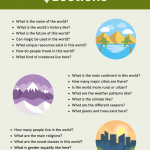
Get the setting right
The setting of your story is very important, as this is where everything in your story will happen. You can choose to stick to one setting or move between various settings. Depending on what your story is about, you can choose to set the whole story in someone’s house or even just the school canteen. Or you can go all out on selecting various settings for your story, especially if it’s a story about time-travelling or just normal travelling.
Whatever your setting is remember to explain all the little details so your readers can also imagine being there with the characters. And by little details, we mean even the tiniest detail can make a huge difference. For example, if you chose a bus shelter as one of the key settings in your story, talk about the cracks on the glass or the pieces of litter on the floor. Don’t just stick to the appearance of objects, go further by describing the smell in the air and the sounds you hear. Just think about the five senses, sight, smell, taste, hear and touch for ideas.
Plan the ultimate climax
The climax of the story is where the actual conflict happens or where your main character’s problems are at their highest point. This is the key moment just before the solution is revealed and normally happens towards the end of the story. To make sure your story has the ultimate climax give your character limited options, so they feel trapped or overwhelmed by recent events. This can then build up to a powerful ending (discussed in the next section).
In the actual climax itself, your main character should use a new skill, piece of information or even friends they made before this point. It is important to remember that without this “new something” your character could never have overcome their problem earlier on in the story. If your readers feel that your main character could have easily overcome their problems at the beginning of the story, then your climax is likely to disappoint your readers
The climax is the perfect place to demonstrate how much your character has grown since the beginning of the story. And to provide a valuable life lesson to your readers. And there are a number of things your character might learn, such as:
- Discovering what they wanted was bad and now changing their want
- Having to sacrifice something important to them to help/save someone else
- Realising the consequences of their past behaviour
It is important to note that the actual climactic scene of your story should feature your character facing their problems alone. Even if your main character received help from other characters throughout the story. The climax must have a moment where only your main character goes ahead and defeats the problem.
Plan an awesome ending
Your ending doesn’t need to be very long and drawn out. In fact, it can quickly end after the climax. But that doesn’t mean that you should rush it off without considering your readers. There are a number of ways you can end your story, which include:
- Happy Ending: The conflict ends, and the hero wins and lives happily ever after with everything they ever wanted.
- Sad Ending: The conflict ends, but there were some difficulties or consequences because of how this conflict ended.
- Cliff Hanger: The main conflict ends, but the reader does not know what happened to the main character or another bigger conflict is revealed to the readers.
- Twist Ending: The most unexpected thing happens at the end, shocking the reader.
It is important when planning the ending that it clearly shows the end of the main conflict your character was facing throughout the story. And that this conflict was resolved through your main character’s actions. For example, if your main character was cursed by an evil witch and now they can’t speak at all. The ending should show that your main character was able to overcome this curse and live their life happily (if this was a happy ending).
When planning your ending you might want to play around with different endings to your story to see which one is the most powerful and exciting for your readers.
Outline your story
Before actually writing your story, we suggest you sit down and write out the basic structure of your story (preferably in one sitting). There are a number of ways you can do this, but the simplest way may be to list everything you know about your story somewhere (See our guide on how to outline a book with a free template). This will help you to note down every idea you have about your story and make sure nothing interesting gets missed out or forgotten about. Listing out your key scenes can also help you identify any holes in your plot and opportunities to make your story even better. This can even save you time and frustration when it comes to actually writing your story.
Once you have finished listing out all your scene ideas, take a moment to look through your list. If you feel a scene idea is not clear or does not connect you can highlight these ideas. You may also highlight ideas that need further research. Now review all the highlighted ideas again and expand on these until they make sense or maybe just remove them from the story if there is no real connection. Think about alternative scenes that your reader won’t expect. For example, you might have 3 different ideas for how your story will end.
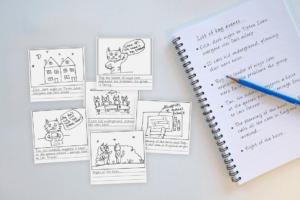
You might even go a step further and sketch out the main scenes of your story using a storyboard or even some index cards. A storyboard will help you logically layout the key scenes in your story and swap them around to see what works best. A storyboard can also ensure that there are no gaps in your story or even scenes that repeat themselves. Once you are happy with your outline and feel confident that all the key areas of your story have been covered, you can move on to writing your first draft.
Writing Your Story
Now it’s time to start writing the first draft of your story. We call it the first draft because it is highly likely that you will have to write your story a number of times before it is ready to be published.
Write the opening
The opening sentence is one of the most essential parts of any story. It hooks the reader and encourages them to read on if they like the opening. Let’s all face it, there’s nothing really exciting about a story that starts off like, “One day I went to the park…”.
So what makes a good opening? A good opening should set the scene and get the reader excited about what will happen next. It should give enough information to the reader, so they are faced with a series of questions in their head, such as why did this happen? Some of the information you might include in your opening may be details of a setting, a character description or a significant memory in their life. For example. Danny The Champion Of The World by Roald Dahl starts off by describing the main character’s backstory:
“When I was four months old, my mother died suddenly and my father was left to look after me all by himself.”
Your opening should also set the mood for the entire story. For example, if you are writing a horror story, you might want to set a dark tone at the beginning. But bear in mind just because you are writing a horror story, you can still include humour or change tones slightly throughout the story. You just need to remember the overall mood of your story.
There are a number of ways to open your story, such as:
- Starting with dialogue: A character in your story could be talking about something.
- Begin with an action scene: Something might have happened to your main character.
- Describe the setting: Use sensory details to describe an important setting.
- Describe the character’s backstory: Your character has an important memory to share.
An extra tip for your opening is that you might want to plan a number of openings for your story to see which one is the most exciting.
Use effective dialogue
Dialogue is speech between two or more characters. This can be expressed internally through thoughts or externally through conversations. Effective dialogue sets the scene, adds drama and develops your character’s personality. Dialogue also breaks up big chunks of descriptive text to add more life to your story and characters.
While using dialogue in your story may seem like a great idea, it can get boring if used wrongly. A mistake some writers make is including long dialogue between characters talking about minor or unnecessary things that have very little relation to the main conflict. While dialogue may seem like an easy way to clarify parts of your story, don’t use it as the only way to describe your story’s plot. Keep your dialogue short and simple, with important and interesting information.
Another common mistake in writing dialogue is not including the character’s emotions or personality in the dialogue. You might use straightforward direct words, but we all know that conversations in real life aren’t always that direct and simple. Try inventing your own words and don’t be afraid of including informal or slang words in your dialogue, as this could add to your character’s personality.
Learn how to write effective dialogue with our guide on how to write dialogue.
Include sensory elements
Sensory elements is another word for including the five senses throughout your story. When drafting out your story, try to find opportunities to include all the senses (not just sight). For example, if you’re introducing a new character, talk about how they smell, what their voice sounds like as well as any features that stand out. The same goes for when you are describing different settings or scenes in your story (see our section on settings above). Sensory elements make the reader feel like they are experiencing the story for themselves.
Typically taste is the least used sense in any story because it is hard to think about how something tastes unless your character is actually eating something. But a very good way to use the taste sense could be to describe how your character is feeling at a certain moment. For example, if your character is walking through a scary corridor, you can say their mouth felt dry and tasted like dry cement. This gives the reader a feeling of how scared or nervous that character felt at that moment.
Write the Ending
We already touched on the ending above so won’t go into too much detail here. The key to a good ending is to make sure your readers don’t feel disappointed after finishing your book. Make sure you don’t rush the ending by missing out on key details as to why this is the ending. For example, if you are ending on a happy note, don’t forget to tell your readers how and why your character/s are happy now compared to the beginning of the story.
The ending is a good place to close any gaps or things you forgot to mention earlier on, such as side characters which may have disappeared or a minor conflict that was never resolved. Your ending should also feature your main character otherwise the ending would be pointless to the reader.
Finally, no matter how you are ending your story, make sure the main conflict is resolved in some way. Whether this is a good solution or a solution with terrible consequences, you should clearly show the end of the conflict. As a bonus, a good ending almost always has a memorable last line. So when you are writing your ending, you might what to write down several last lines and pick the best one that summarises your story the best.
Publishing Your Story
Your first draft is now complete, it’s time to read and edit your story until you are happy to share it with the world.
Read and edit
If you have written your story on a computer, we suggest you print it out as it will make it easier for you to read a printed version. Once you have your story in hand, find a pen (preferably a red one) to circle or make notes of anything that doesn’t make sense in your story. When reading your story, we suggest reading it out loud, so you can listen to any words that are repeated or sentences that don’t make any sense.
Read your whole story in one sitting, as you read you can make notes in any white spaces around the story text. While reading lookout for any boring or unnecessary information in your story and highlight it. In your first reading, we suggest that you avoid looking at spelling and grammar errors, instead focus on the content and ideas in your story. Once you have done this, you can edit your first draft. It is likely that your second draft will be slightly shorter, as you would have removed any boring parts of the story. Do the same with your second draft, ask yourself if the plot is clear and interesting? Are the characters interesting? Have I described the setting clearly?
When you are happy with the story concept, you can then move on to editing your story for spelling and grammar mistakes. At this stage, you can also look for opportunities to be more descriptive and sentences that start with the same words. Once you have sorted out these mistakes, you can ask someone else to read your story or even read it out loud to them. Another person will be able to give you feedback on how interesting your story is and whether it makes sense. They may even be able to give ideas on how to improve your story further.
The final step is the edit your final draft with all the changes you identified and then it’s ready for publishing.
Give your story a title
Your story is almost ready, but we need to give it an interesting title. When picking a title for your story, you might focus on a particular quote, the name of the main character, or even key objects from your story. In most cases story titles are short and easy to remember, so avoid using long and complicated words in the title.
If you can’t find inspiration from your own story, try doing some research by looking at other book titles or using our book title generator. When researching make note of book titles that interest you and review your list to see what they have in common. You might even draw inspiration from everyday stuff, such as music or a movie you recently saw.
Remember the story title is the first thing your reader will see, therefore it should make them curious to open and read your book.
Publish your story
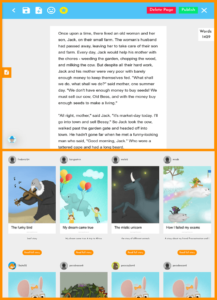
So your story is now ready to be shared with the world! You can publish your story for free on many websites, including Imagine Forest. The benefit of publishing your story on this site is that you can share your story with a community of active members and receive feedback from other writers. You can even include images, create a cover for your story and print out your final story to share with friends and family.
With a solid story under your belt, you might be ready to write some more stories. To motivate yourself you can enter many story writing competitions for young writers, where you can win awesome prizes for your writing skills. We also recommend our weekly short story challenge for those who want to practice their creative writing skills.
So, to summarise…
Writing a good children’s story requires a lot of research and planning before you even actual begin writing it. And even with all your notes and ideas, drafting, rewriting and getting feedback can take a long time. The important thing to remember is to let your imagination run wild and never worry too much about spelling or grammar (or at least not at the beginning).
If you’re looking for a quick step-by-step on how to write a children’s story, then here is a summary of all the crucial steps you’ll need from planning to publishing your story:
- Brainstorm your ideas
- Develop your ideas
- Develop your characters
- Get the setting right
- Plan the ultimate climax
- Plan an awesome ending
- Outline your story
- Write the opening
- Use effective dialogue
- Include sensory elements
- Write the Ending
- Read and edit
- Give your story a title
- Publish your story
Are you ready to write a story? Let us know your beginner tips for writing stories and what your next story is about in the comments below.


Comments loading...