How To Write A Picture Book in 18 Steps
Ever dreamed of writing a picture book? Learn how with this simple guide on how to write a picture book in 18 steps with examples. We’ll cover everything from brainstorming ideas to final publication so you can share your story with young readers. Let’s dive in and start bringing your picture book to life!
- What is a Picture Book?
- How To Write a Picture Book in 18 Steps
- Step 1: Define Your Target Audience
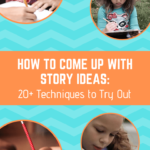
- Step 2: Brainstorm Ideas
- Step 3: Develop Your Idea
- Step 4: Create Memorable Characters
- Step 5: Outline Your Story
- Step 6: Choose a Narrative Style
- Step 7: Write a 1st Draft
- Step 8: Edit and Refine
- Step 9: The Book Title
- Step 10: Create a Dummy Book
- Step 11: Format Your Book
- Step 12: Illustrate Your Book
- Step 13: Design Book Cover
- Step 14: Update the Dummy Book
- Step 15: Seek Feedback
- Step 16: Final Polish
- Step 17: Publish Your Book
- Step 18: Celebrate
- Frequently Asked Questions
- Summary
What is a Picture Book?
A picture book is a form of children’s literature that combines written text with illustrations, often targeting younger readers up to around 8 years old. Unlike novels or chapter books, picture books rely heavily on illustrations to convey the narrative, making them an essential component of the storytelling process. These books typically feature a relatively simple storyline, accompanied by vibrant and engaging artwork that enhances the reader’s understanding and enjoyment.
Picture books come in various formats and styles, ranging from traditional hardcover editions to board books designed for infants and toddlers. They cover a wide range of themes and topics, from whimsical adventures to educational narratives, aiming to captivate young imaginations and foster a love of reading from an early age.
In addition to entertaining young readers, picture books also play a crucial role in promoting literacy and language development. The combination of text and visuals encourages children to make connections between words and images, aiding in comprehension and vocabulary acquisition. Furthermore, the interactive nature of picture books can spark curiosity and creativity, prompting discussions and inspiring imaginative play.
Key Characteristics of a Picture Book
Here are the key characteristics of a picture book:
- Visual Storytelling: Vibrant illustrations, whether painted, drawn, or digitally rendered, play a crucial role in carrying the story forward. They expand upon the text, reveal emotions, and set the scene, igniting the reader’s imagination.
- Sparsity of text: Picture books typically have limited text, using simple, evocative language accessible to young readers. This encourages engagement with the illustrations and fosters imagination.
- Focus on character development: Picture books often introduce young readers to relatable characters who navigate challenges, experience emotions, and learn valuable lessons.
- Genre Versatility: Picture books encompass a wide range of genres, from whimsical fantasy to heart-warming realism, tackling themes of friendship, loss, identity, and more.
- Appeal to a range of ages: While primarily designed for children, picture books can resonate with adults as well, offering deeper layers of meaning and emotional connection.
Whether you’re an aspiring author or simply curious about this captivating literary form, understanding the essence of a picture book is the first step to appreciating its magic and exploring its potential.
Types of Picture Books
Picture books come in various types, each catering to different ages, interests, and reading levels. Understanding these types can help writers and illustrators tailor their creations to suit their target audience effectively. Here are some common types of picture books:
- Board Books: Sturdy and often made of thick cardboard, board books are designed for infants and toddlers. They feature simple, colourful illustrations and minimal text, focusing on basic concepts such as shapes, colours, animals, and everyday routines. Board books are durable and suitable for little hands, making them ideal for introducing babies to the joy of reading.
- Concept Books: Concept books are centred around teaching specific concepts or skills, such as counting, alphabet, opposites, and emotions. They use engaging illustrations and straightforward text to help young readers grasp abstract ideas in a fun and accessible way. Concept books are invaluable tools for early childhood education, laying the foundation for future learning.
- Storybooks: Storybooks form the bulk of picture book literature, featuring narrative-driven stories with engaging characters, plots, and themes. They cover a wide range of genres, including fantasy, adventure, humour, and friendship, catering to diverse interests and tastes. Storybooks typically contain more text than other types of picture books, accompanied by detailed illustrations that bring the story to life.
- Wordless Picture Books: Wordless picture books rely solely on illustrations to tell a story, empty of any written text. They encourage readers to interpret the narrative through visual cues, fostering imagination, creativity, and critical thinking skills. Wordless picture books are particularly beneficial for pre-readers and language learners, allowing them to engage with the story independently and at their own pace.
- Interactive Books: Interactive picture books incorporate elements that encourage reader participation, such as lift-the-flap, touch-and-feel, or pop-up features. These books actively involve children in the reading experience, prompting them to interact with the story in various ways. Interactive books enhance engagement and sensory exploration, making reading a hands-on and enjoyable activity.
- Biographical and Non-Fiction Picture Books: Biographical and non-fiction picture books explore real-life people, events, and topics, providing educational and informative content for young readers. They combine engaging storytelling with factual accuracy, presenting complex subjects in a clear and accessible manner. Biographical and non-fiction picture books inspire curiosity and broaden children’s understanding of the world around them.
By understanding the different types of picture books available, writers and illustrators can create captivating and relevant stories that resonate with their intended audience.
How To Write a Picture Book in 18 Steps
Follow this 18-step guide to take your picture book from the initial concept to the published masterpiece.
Step 1: Define Your Target Audience
Before diving into the creative process, it’s essential to identify who your picture book is intended for. Understanding your target audience will guide your storytelling decisions, including the themes, language, and visual elements you incorporate into your book.
Let’s say you’re planning to write a picture book about a mischievous kitten’s adventures. Before you start brainstorming ideas, consider who will be reading your book. Are you targeting toddlers who love cute animal stories? Or perhaps preschoolers who enjoy interactive narratives? By defining your target audience as young children between the ages of 2 and 5, you can tailor your story and illustrations to align with their interests and developmental stage.
By defining your target audience upfront, you can ensure that your picture book resonates with the right readers and meets their needs effectively.
Step 2: Brainstorm Ideas
Once you’ve defined your target audience, it’s time to let your creativity flow and generate potential concepts for your picture book. Brainstorming allows you to explore different themes, settings, and plotlines, ensuring that you find the perfect idea to bring to life.
Imagine you’ve decided to create a picture book aimed at preschoolers with a focus on teaching empathy and kindness. To brainstorm ideas, grab a notebook and jot down any thoughts or images that come to mind related to these themes. Consider scenarios that young children can relate to, such as sharing toys, comforting a friend, or helping a lost animal.
You might brainstorm ideas like:
- A story about a shy bunny who learns to make friends by sharing her favourite carrot with a new classmate.
- An adventure featuring a group of animal friends who work together to rescue a lost puppy and reunite it with its family.
- A tale about a curious bear cub who discovers the joy of helping others when he finds a lost teddy bear in the woods.
During the brainstorming process, don’t worry about perfection or feasibility. The goal is to generate as many ideas as possible, no matter how wild or unconventional they may seem. Once you have a list of potential concepts, you can evaluate them based on their suitability for your target audience and the message you want to convey.
By brainstorming ideas, you’ll uncover creative gems that have the potential to become captivating picture books that resonate with young readers. So grab your notebook and let your imagination soar!
Step 3: Develop Your Idea
Once you’ve settled on a promising concept for your picture book, it’s time to flesh out your idea and develop it into a coherent storyline. This stage involves expanding on your initial concept, crafting engaging characters, and mapping out the key events that will drive your narrative forward.
Here you can choose one idea from the previous step and form a paragraph idea summary for it. The idea summary should ideally include the following three elements, a hint at the main characters, what they want and why they can’t get what they want.
For example for the idea of a shy bunny, your idea summary might look something like this:
In a peaceful woodland clearing, there lives a shy bunny named Blossom, whose heart is as tender as the petals of a spring flower. Despite her gentle nature, Blossom longs for the warmth of friendship but struggles to overcome her timid disposition. When a new classmate, a timid squirrel named Hazel, joins the woodland school, Blossom sees an opportunity to extend an olive branch. She yearns to share her most prized possession, a plump, juicy carrot, as a gesture of friendship. However, her insecurities and fear of rejection hold her back, making it challenging for her to take the first step towards forming a connection. As Blossom grapples with her inner turmoil, she must find the courage to reach out to Hazel and discover the transformative power of kindness and generosity.
By developing your idea in this way, you’ll lay the groundwork for a compelling and emotionally resonant story that will captivate young readers and leave a lasting impression.
Step 4: Create Memorable Characters
One of the key elements that bring a picture book to life is its characters. Memorable and relatable characters can capture the hearts of young readers and keep them engaged throughout the story. In this step, focus on developing characters that are unique, multi-dimensional, and well-suited to the theme and tone of your book.
Let’s continue with the example of the shy bunny from our previous step. To create memorable characters, start by brainstorming traits and characteristics that will make your bunny protagonist endearing and relatable to your target audience of preschoolers. Consider aspects such as:
- Personality: Is the bunny timid yet kind-hearted? Does she have any quirks or special talents that set her apart?
- Appearance: What does the bunny look like? Does she have distinctive features or a unique fashion sense?
- Goals and Motivations: What does the bunny hope to achieve throughout the story? What drives her to overcome her shyness and reach out to others?
- Relationships: How does the bunny interact with other characters in the story? Does she have a supportive family or friends who play a significant role in her journey?
For example, you might envision your bunny protagonist as a soft-spoken but compassionate creature with floppy ears and a love for gardening. She dreams of making friends but struggles with self-doubt and anxiety in social situations. However, her love for growing carrots and flowers serves as a source of comfort and confidence, helping her connect with others on a deeper level.
In addition to the main character, don’t forget to create supporting characters that complement and enhance the storyline. These could include friends, family members, or even quirky sidekicks who add humour and depth to the narrative.
By crafting well-developed and relatable characters, you’ll create a strong emotional connection with your readers, ensuring that your picture book leaves a lasting impression long after the final page is turned.
Step 5: Outline Your Story
With your characters established, it’s time to map out the plot of your picture book. Creating an outline helps you structure your story, ensuring that it flows smoothly from beginning to end and effectively conveys your message or theme to young readers.
Continuing with our example of the shy bunny protagonist, let’s outline the key events and plot points that will drive her journey of overcoming shyness and making friends, along with notes on illustrations to possibly include:
- Introduction:
- Introduce the shy bunny protagonist and establish her desire to make friends.
- Illustration: Show the bunny in her garden home, surrounded by lush greenery and flowers, looking wistfully at other animals playing together in the distance.
- Inciting Incident:
- The bunny encounters a new animal friend, perhaps a lost squirrel or a curious bird, who wanders into her garden.
- Initially hesitant, the bunny observes the visitor from afar, curious but unsure how to approach them.
- Illustration: Show the bunny peeking out from behind a bush, watching the visitor with wide eyes, while the visitor looks back with a friendly expression.
- Rising Action:
- Through a series of gentle interactions and shared experiences, the bunny and the visitor gradually bond.
- They discover common interests, such as a love for nature and a fondness for carrots.
- Illustration: Show the bunny and the visitor exploring the garden together, perhaps digging in the soil or nibbling on carrots side by side.
- Conflict:
- The friendship faces challenges when the bunny’s new friend must return to their own home or face a difficult situation.
- The bunny must summon the courage to say goodbye or find a way to help her friend, demonstrating her growth and resilience.
- Illustration: Depict a moment of farewell between the bunny and her friend, perhaps with a tearful hug or a solemn exchange of gifts.
- Resolution:
- The bunny learns valuable lessons about empathy, kindness, and the importance of reaching out to others.
- Though sad to see her friend go, the bunny feels grateful for the connection they shared and looks forward to future adventures with newfound confidence.
- Illustration: Show the bunny standing tall and smiling as she waves goodbye to her friend, surrounded by blooming flowers and a sense of peaceful acceptance.
By outlining your story with notes on illustrations, you’ll ensure that the visual elements of your picture book complement and enhance the narrative, creating a rich and immersive reading experience for young audiences.
Step 6: Choose a Narrative Style
The narrative style of your picture book sets the tone and structure of your story, influencing how it will be told and perceived by young readers. Selecting the right narrative style involves considering factors such as the age of your target audience, the complexity of your storyline, and the overall mood you wish to convey.
Let’s continue with our example of the shy bunny protagonist and explore different narrative styles that could suit this story:
- Third-Person: In this narrative style, the story is told from an external perspective, focusing on the thoughts and feelings of the main character, the shy bunny. Using third-person allows for a deeper exploration of the bunny’s internal struggles and growth while maintaining a sense of distance from other characters.
- First-Person: Alternatively, you could opt for a first-person narrative style, where the shy bunny herself narrates the story. This approach provides a direct and intimate connection with the protagonist, allowing readers to experience her emotions and experiences firsthand. First-person narration can be particularly effective for engaging young readers and immersing them in the story’s world.
- Dialogue-Driven: Another option is to structure the story around dialogue between characters, with minimal narration. This dialogue-driven approach creates a dynamic and interactive reading experience, allowing young readers to actively engage with the characters and their interactions. Dialogue can also convey emotions and character dynamics in a natural and engaging manner.
- Narrative Poem: For a more lyrical and poetic narrative style, you could explore writing the story as a narrative poem. Using rhythmic language and vivid imagery, a narrative poem can evoke a sense of magic and wonder, drawing readers into the enchanting world of the shy bunny and her adventures.
When choosing a narrative style for your picture book, consider experimenting with different approaches to see which best suits your story and resonates with your target audience. Ultimately, the goal is to create a narrative that captivates young readers and leaves a lasting impression.
Step 7: Write a 1st Draft
With your ideas, characters, and outline in place, it’s time to start writing the first draft of your picture book. This initial draft serves as the foundation upon which you’ll build and refine your story, so don’t worry about perfection at this stage. The focus is on getting your ideas down on paper and bringing your story to life.
Continuing with our example of the shy bunny protagonist, let’s begin writing the first draft of her story. Using the outline we created earlier as a guide, we’ll flesh out each plot point and scene, keeping in mind the narrative style and tone we’ve chosen.
Example:
Once upon a time, in a quiet corner of the forest, there lived a shy bunny named Blossom. She spent her days tending to her garden, surrounded by bright flowers and lush greens. Despite the beauty of her surroundings, Blossom often felt lonely, watching from afar as other animals danced and played together.
One sunny morning, as Blossom was tending to her carrots, she noticed a small squirrel peeking out from behind a tree. Curious, Blossom slowly approached the squirrel, offering a friendly smile.
To Blossom’s surprise, the squirrel, named Nutmeg, was just as curious about her as she was about him. They talked and talked, mostly about their love for crunchy carrots, and spent the day exploring the garden together.
As the sun began to set, Nutmeg said that he was lost and needed to find his way home. Blossom felt a pang of sadness at the thought of saying goodbye, but she knew she had to be brave for her new friend.
With a heavy heart, Blossom said goodbye to Nutmeg, promising to keep the memories they had shared. As she watched him disappear into the forest, she felt a sense of warmth and happiness for the friendship they had.
As you write the first draft of your picture book, focus on capturing the essence of your story and characters while allowing room for creativity and spontaneity. Remember, you can always revise and refine your draft in the editing stage, so let your imagination soar as you bring your picture book to life on the page.
Step 8: Edit and Refine
Once you’ve completed the first draft of your picture book, it’s time to step back and take a critical look at your work. Editing and refining your manuscript is a crucial part of the writing process, helping you polish your story and ensure that it resonates with your target audience.
Let’s revisit our example from the previous step and explore how we can edit and refine the first draft to enhance its clarity, coherence, and emotional impact.
- Review for Clarity: Read through your manuscript with fresh eyes, paying attention to the clarity of your language and the flow of your narrative. Are there any confusing or ambiguous passages that need clarification? Make revisions to ensure that your story is easy to follow and understand, especially for your young audience.
- Refine Character Development: Evaluate the depth and complexity of your characters, particularly the protagonist, Blossom the shy bunny. Does she undergo a meaningful transformation throughout the story? Are her actions and motivations consistent with her personality and growth arc? Fine-tune your characterisation to create relatable and multi-dimensional characters that young readers can connect with.
- Polish Dialogue and Language: Review the dialogue in your manuscript to ensure that it sounds natural and age-appropriate for your target audience. Aim for dialogue that reflects the unique voices and personalities of your characters while avoiding overly complex language or adult-centric expressions. Additionally, pay attention to the rhythm and pacing of your prose, striving for a balance between descriptive passages and engaging dialogue.
- Streamline Plot and Structure: Evaluate the pacing and structure of your story, paying attention to the balance between exposition, rising action, climax, and resolution. Are there any unnecessary scenes or digressions that could be trimmed to streamline the plot? Look for opportunities to heighten tension and suspense, keeping young readers eagerly turning the pages from start to finish.
By carefully editing and refining your picture book manuscript, you’ll ensure that it shines brightly and captivates young readers with its charm, warmth, and imagination.
Step 9: The Book Title
Choosing the right title for your picture book is essential as it serves as the first point of connection between your story and potential readers. A compelling title can pique curiosity, convey the theme or mood of your book, and capture the attention of your target audience.
Let’s consider our shy bunny example and explore how we can craft a suitable title that encapsulates the essence of the story:
- Title Option 1: Blossom’s Brave Journey
This title highlights the protagonist, Blossom the shy bunny, and emphasises her journey of overcoming shyness and embarking on an adventure. The word “brave” conveys the courage and resilience Blossom demonstrates throughout the story, while “journey” hints at the transformative nature of her experiences.
- Title Option 2: Carrots and Friendship
Focusing on key elements of the story, this title highlights the themes of friendship and shared experiences. The mention of “carrots” reflects the bond that Blossom and her new friend Nutmeg form over their love for crunchy vegetables, while “friendship” underscores the central theme of forging connections with others.
- Title Option 3: Blossom Finds a Friend
This straightforward title succinctly captures the heartwarming essence of the story: a shy bunny named Blossom who discovers the joy of friendship. The phrase “finds a friend” conveys the journey of connection and companionship that Blossom embarks on, appealing to young readers’ curiosity and empathy.
When choosing a title for your picture book, consider the themes, characters, and tone of your story, as well as the preferences of your target audience. Experiment with different options, and don’t be afraid to seek feedback from friends, family, or writing peers to help you find the perfect title that will enchant and intrigue readers.
Step 10: Create a Dummy Book
Creating a dummy book is an essential step in the picture book writing process, allowing you to visualise and organise the layout of your story. A dummy book is a mock-up of your picture book that includes rough sketches or placeholders for illustrations, text layout, and page design.
Let’s continue with our example and explore how to create a dummy book for this story:
- Gather Materials: Start by gathering materials such as blank paper, pencils, erasers, and a ruler. You’ll use these supplies to sketch out the layout of your dummy book.
- Sketch Thumbnails: Begin by creating thumbnail sketches of each page spread in your picture book. These small, rough drawings will help you visualise the composition and flow of your illustrations. Focus on capturing the key moments and scenes from your story, paying attention to pacing and page turns.
- Design Page Layout: Once you have your thumbnail sketches, use them to plan the layout of each page spread in your dummy book. Consider factors such as text placement, illustration size, and white space. Experiment with different arrangements to find the most visually appealing and reader-friendly layout.
- Add Text and Illustrations: With the page layout in place, add placeholders for text and illustrations to your dummy book. You can use handwritten text or printed text from your manuscript, along with simple sketches or stick figures to represent illustrations. Focus on conveying the narrative flow and visual storytelling of your picture book.
- Assemble the Dummy Book: Arrange your pages in sequence and secure them together to create your dummy book. You can use a binder, paper clips, or string to hold the pages together. Make sure the pages are easy to flip through and that the layout accurately reflects the pacing and structure of your story.
- Review and Revise: Once you’ve assembled your dummy book, review it carefully to identify any areas that need revision or refinement. Pay attention to the overall flow of the story, the balance between text and illustrations, and the coherence of the page layout. Make adjustments as needed to ensure that your dummy book accurately represents your vision for the final picture book.
By creating a dummy book, you’ll gain valuable insights into the visual and structural elements of your picture book, helping you refine your story and prepare it for the next stages of the publishing process.
Step 11: Format Your Book
Formatting your picture book involves arranging the text and illustrations in a way that enhances the reading experience and ensures visual coherence. Paying attention to formatting details such as page size, font choice, and text placement is essential for creating a professional-looking final product.
Let’s continue with our example of “Blossom Finds a Friend” and explore how to format the book for publication:
- Page Size and Layout: Determine the dimensions of your picture book, taking into account industry standards and printing specifications. Common picture book sizes include 8.5 x 8.5 inches or 10 x 10 inches. Choose a size that complements your illustrations and allows for easy readability.
- Text Placement: Decide on the placement of text within each page spread. Aim for a balance between text and illustrations, ensuring that the two elements complement each other and work together to tell the story. Experiment with different text arrangements, such as placing text above, below, or alongside illustrations, to find the most visually appealing layout.
- Font Choice and Styling: Select a suitable font for the text in your picture book, keeping in mind readability and aesthetic considerations. Choose a clear, legible font that aligns with the tone and style of your story. Consider factors such as font size, style (e.g., serif or sans-serif), and colour to enhance readability and visual appeal.
- Page Numbers and Pagination: Determine how you will handle page numbering and pagination in your picture book. Decide whether to include page numbers, and if so, where to place them within the layout. Considerations such as page breaks, chapter divisions, and endpapers should also be taken into account to ensure a seamless reading experience.
- Illustration Placement: Integrate illustrations seamlessly into the layout of your picture book, ensuring that they enhance the storytelling and capture the reader’s attention. Pay attention to the positioning and size of illustrations relative to the text, allowing for ample space and visual impact.
- Consistency and Cohesion: Maintain consistency throughout your picture book by adhering to a cohesive design aesthetic. Ensure that fonts, colours, and formatting elements remain consistent across all pages, creating a unified look and feel. Pay attention to details such as margins, line spacing, and alignment to achieve a polished and professional appearance.
By carefully formatting your picture book, you’ll create a visually engaging and cohesive reading experience that captivates young readers and brings your story to life.
Step 12: Illustrate Your Book
Illustrations play a vital role in bringing your picture book to life, capturing the imagination of young readers and enhancing the storytelling experience. Whether you’re an illustrator yourself or collaborating with a professional artist, creating compelling and engaging illustrations is essential for captivating your audience.
There are several technical considerations to keep in mind when illustrating a picture book:
- Visualising Characters: Work with your illustrator to develop visually appealing and expressive character designs that reflect the personalities and emotions of your characters. For example, the shy bunny protagonist, Blossom, could be depicted with soft, rounded features and wide, expressive eyes to convey her gentle nature and timid disposition.
- Promoting Engagement: Incorporate interactive and engaging elements into your illustrations to capture the attention and imagination of young readers. For example, hidden details, interactive flaps, or playful visual motifs can encourage children to actively engage with the story and explore the illustrations more deeply.
- Page Size and Bleed: Ensure that your illustrations are sized appropriately for the dimensions of the book’s pages. Additionally, if your illustrations extend to the edge of the page (full bleed), you’ll need to include extra space around the edges to accommodate trimming during printing.
- Resolution: Illustrations should be created at a high resolution (usually 300 dpi or higher) to ensure crisp and clear printing. This is especially important for detailed artwork and images with fine lines or small details.
- Colour Mode: Use the appropriate colour mode for your illustrations. For print books, illustrations are typically created in CMYK colour mode to accurately represent colours when printed. If your illustrations are intended for digital distribution, RGB colour mode may be more suitable.
- File Format: Save your illustrations in a suitable file format for printing, such as TIFF or PSD for high-resolution images with layers, or JPEG for flattened images. Be sure to check the publisher’s specifications for preferred file formats.
- Text Placement: Leave space within your illustrations for text placement, especially if your illustrations include background elements or focal points where text will be overlaid. Consider how the text will interact with the illustrations and ensure that important visual elements are not obscured.
- Consistency: Maintain consistency in style, colour palette, and artistic elements throughout your illustrations to create a cohesive visual experience. This helps tie the illustrations together and reinforces the story’s themes and mood.
- Page Turns: Keep in mind the pacing and flow of the story when planning your illustrations. Consider how each page turn will reveal new information or advance the plot, and create illustrations that enhance the narrative tension and engagement.
- Accessibility: Ensure that your illustrations are accessible to all readers, including those with visual impairments. Avoid relying solely on visual cues to convey important information, and consider including descriptive text or alternative formats (e.g., braille) where appropriate.
By investing time and effort into creating captivating illustrations, you’ll create a visually stunning picture book that delights and inspires young readers, inviting them to embark on an enchanting journey of imagination and discovery.
Step 13: Design Book Cover
The book cover is often the first thing readers see, making it a crucial element in attracting attention and conveying the essence of your picture book. A well-designed cover should intrigue readers, reflect the tone of your story, and entice them to pick up your book.
Let’s continue with our example of “Blossom Finds a Friend” and explore how to design an eye-catching cover for this picture book:
- Title and Author Name: Ensure that the title of your book is prominently displayed on the cover, along with your name as the author. Choose a font and layout that are visually appealing and easy to read, even from a distance.
- Example: The title “Blossom Finds a Friend” is written in bold, playful lettering, with the author’s name, “Jane Doe”, placed below in a smaller font. Both elements stand out against a background of lush garden foliage, drawing the reader’s attention.
- Illustration: Select a captivating illustration for the cover that encapsulates the theme or key elements of your story. The cover illustration should grab the reader’s attention and evoke curiosity about what lies within the pages of the book.
- Example: The cover features a charming illustration of Blossom the shy bunny peeking out from behind a bush, her eyes wide with curiosity as she gazes at the reader. In the background, colourful flowers and friendly woodland creatures add depth and visual interest to the scene.
- Colour Palette: Choose colours that complement the mood and setting of your story, while also grabbing attention on the bookstore shelf. Consider using vibrant hues to create a sense of warmth and whimsy, or subtle pastels for a softer, more enchanting feel.
- Example: The cover incorporates a bright and cheerful colour palette, with shades of green, pink, and blue dominating the background. These colours evoke the beauty and tranquillity of a garden setting, while also conveying a sense of joy and optimism.
- Spine and Back Cover: Don’t forget to design the spine and back cover of your book as well. The spine should display the title and author name in a legible font, while the back cover can feature a brief synopsis of the story, endorsements or reviews, and additional illustrations or graphics.
- Example: The spine of the book displays the title and author name vertically, making it easy to identify when shelved alongside other books. The back cover includes a brief summary of the story, along with a small illustration of Blossom and her friends exploring the garden.
By carefully designing the book cover, you’ll create a captivating first impression that entices readers to pick up your picture book and embark on an enchanting journey with your characters.
Step 14: Update the Dummy Book
Once you have completed the illustration process and made any necessary adjustments based on feedback, it’s time to update your dummy book to reflect the final layout and design of your picture book. This step ensures that the dummy book accurately represents the finished product before moving forward with publication.
Continuing with our example of “Blossom Finds a Friend” let’s explore how to update the dummy book with the final illustrations and design elements:
- Replace Placeholder Illustrations: Replace any placeholder illustrations in the dummy book with the final illustrations created for each page spread. Ensure that the illustrations are correctly sized and positioned within the layout, maintaining consistency with the visual storytelling of the story.
- Example: In the first dummy book, placeholder sketches were used to represent each page spread. Now, the final illustrations of Blossom the shy bunny and her garden adventures are added to the appropriate pages, bringing the story to life with vibrant colours and engaging details.
- Incorporate Text and Layout Changes: Make any necessary adjustments to the text layout and formatting based on the final manuscript and design specifications. Ensure that the text is correctly aligned, sized, and spaced to complement the illustrations and maintain readability.
- Example: The text is carefully integrated into each page spread, with attention to text placement, font choice, and spacing. Captions and dialogue bubbles are added where appropriate, enhancing the storytelling and guiding the reader through the narrative.
- Review Overall Presentation: Take a step back and review the overall presentation of the dummy book, paying attention to details such as page flow, pacing, and visual coherence. Ensure that the illustrations, text, and design elements work together harmoniously to create a seamless and engaging reading experience.
- Example: The updated dummy book PDF is reviewed to ensure that the illustrations and text flow smoothly from one page to the next, capturing the reader’s attention and maintaining their interest throughout the story. Any inconsistencies or discrepancies are addressed to achieve a polished and professional final product.
By updating the dummy book with the final illustrations and design elements, you’ll have a clear representation of how your picture book will look and feel in its printed form. This step is crucial for ensuring that the final product meets your vision and expectations before proceeding to the next stage of publication.
Step 15: Seek Feedback
Seeking feedback from others is a crucial step in the picture book writing process. Feedback helps you identify strengths and weaknesses in your story, gain new perspectives, and refine your manuscript to ensure it resonates with your target audience.
Continuing with our example of “Blossom Finds a Friend” let’s explore how seeking feedback can improve the quality of your picture book:
- Beta Readers: Share your picture book with beta readers who represent your target audience, such as parents, teachers, or children’s librarians. Ask for their honest feedback on aspects such as story structure, character development, and overall appeal. Pay attention to their reactions and suggestions for improvement.
- Example: You provide copies of your picture book to a group of parents and their children for feedback. After reading the story together, the parents comment on the relatable themes and positive messages, while the children express excitement about the colourful illustrations and engaging characters.
- Writing Groups or Workshops: Join a writing group or attend workshops focused on picture book writing to connect with other writers and receive constructive criticism. Participating in group discussions and critique sessions can offer valuable insights and support as you refine your manuscript.
- Example: You share your book with fellow writers in a picture book writing workshop. During a critique session, your peers offer suggestions for strengthening character motivations and tightening the pacing of the story. Their feedback helps you identify areas for improvement and revision.
- Professional Editors or Consultants: Consider hiring a professional editor or consultant experienced in children’s literature to provide in-depth feedback on your manuscript. An editor can offer expert guidance on plot development, language usage, and marketability, helping you polish your picture book for publication.
- Example: You work with a children’s book editor who provides detailed feedback on your manuscript, including suggestions for enhancing dialogue, clarifying story arcs, and refining the emotional resonance of the narrative. Their expertise and insights help you elevate the quality of your picture book to industry standards.
- Online Communities and Forums: Engage with online communities and forums dedicated to children’s literature to connect with fellow writers, illustrators, and publishing professionals. Share your work in progress and request feedback from members who can offer diverse perspectives and constructive criticism.
- Example: You post a query about your picture book on an online writing forum for children’s authors. Within hours, you receive valuable feedback from writers, illustrators, and publishing professionals who offer insights into character development, plot pacing, and marketability.
By seeking feedback from a variety of sources, you’ll gain valuable insights into your picture book manuscript and identify opportunities for improvement. Embrace feedback as a valuable tool for honing your craft and creating a picture book that resonates with readers of all ages.
Step 16: Final Polish
During the final polish stage, you’ll meticulously review and fine-tune every aspect of your picture book to ensure it’s polished, professional, and ready for publication. This step involves a comprehensive examination of the manuscript, illustrations, design elements, and overall presentation.
Let’s continue with our example of “Blossom Finds a Friend” and explore how to apply the final polish to your picture book:
- Book Review: Read through the Book one last time, focusing on language, grammar, and punctuation. Look for any remaining typos, inconsistencies, or awkward phrasing that may detract from the reading experience. Make necessary corrections to ensure the text is clear, concise, and engaging.
- Example: You carefully review the book “Blossom Finds a Friend” paying close attention to sentence structure, word choice, and dialogue. You eliminate any redundant phrases, tighten up the prose, and ensure that the language is accessible and age-appropriate for your target audience.
- Illustration Evaluation: Review each illustration in your picture book to ensure they align with the story’s narrative and enhance the overall visual experience. Pay attention to details such as composition, colour palette, and character expressions. Make any final adjustments or corrections to ensure the illustrations are vibrant, cohesive, and captivating.
- Example: You scrutinise the illustrations of Blossom and her garden adventures, checking for consistency in character design, background details, and artistic style. You adjust colours, refine linework, and add subtle details to enhance visual interest and reinforce the story’s themes.
- Design and Layout Check: Evaluate the design and layout of your picture book, including page composition, text placement, and overall aesthetic. Ensure that the design elements flow smoothly from one page to the next, guiding the reader through the story seamlessly. Make any necessary adjustments to enhance the readability and visual appeal of the book.
- Example: You review the layout of “Blossom Finds a Friend” checking for alignment, spacing, and font consistency. You adjust page breaks, text formatting, and illustration placement to create a cohesive and visually appealing presentation that complements the narrative.
- Proofreading and Quality Assurance: Conduct a final proofreading of the entire picture book to catch any lingering errors or inconsistencies. Consider enlisting the help of a trusted proofreader or colleague to provide fresh eyes and identify any overlooked issues. Verify that all elements, including text, illustrations, and design, meet your quality standards and align with your vision for the book.
- Example: You enlist the assistance of a professional proofreader to review the final draft of “Blossom Finds a Friend”. Together, you meticulously comb through every page, checking for spelling errors, formatting inconsistencies, and layout issues. After thorough proofreading and quality assurance, you’re confident that the picture book is polished and ready for publication.
By applying the final polish to your picture book, you’ll ensure that it meets the highest standards of quality and craftsmanship. Take the time to review and refine every aspect of your book, leaving no detail overlooked. Your dedication to excellence will shine through in the finished product, delighting readers of all ages.
Step 17: Publish Your Book
After months of hard work and dedication, it’s time to bring your picture book to life by publishing it and sharing it with the world. Publishing your book involves making decisions about printing, distribution, and marketing to ensure that it reaches your target audience and achieves success.
Let’s continue with our example of “Blossom Finds a Friend” and explore the process of publishing your picture book:
- Choose a Publishing Route: Decide whether you want to pursue traditional publishing or self-publishing for your picture book. Traditional publishing involves submitting your book to literary agents or publishers for consideration, while self-publishing allows you to retain creative control and publish independently.
- Example: You opt for self-publishing “Blossom Finds a Friend” to maintain creative control and have the flexibility to bring your vision to life without the constraints of traditional publishing timelines.
- Select a Printing Option: Research printing options and choose a printing company that meets your budget and quality requirements. Consider factors such as printing methods, paper quality, and turnaround times to select the best option for producing high-quality copies of your picture book.
- Example: You partner with a reputable printing company that specialises in children’s books and offers high-quality printing services at affordable rates. You collaborate closely with the printing team to ensure that the final product meets your expectations and aligns with your vision for the book.
- Plan Distribution Channels: Determine how you’ll distribute your picture book to reach your target audience. Explore distribution options such as selling through online retailers, local bookstores, libraries, and book fairs. Consider whether you’ll offer print copies, e-books, or both to maximise accessibility for readers.
- Example: You establish distribution channels for “Blossom Finds a Friend” by listing it for sale on major online platforms such as Amazon, Barnes & Noble, and independent bookstores. You also partner with local libraries and schools to make the book available to young readers in your community.
- Implement Marketing Strategies: Develop a marketing plan to promote your picture book and generate buzz among your target audience. Utilise social media, author websites, book signings, and promotional events to raise awareness and drive sales. Leverage online and offline marketing channels to reach as many potential readers as possible.
- Example: You launch a comprehensive marketing campaign for “Blossom Finds a Friend” including social media posts, blog tours, and virtual author events. You collaborate with influencers, parenting bloggers, and children’s book reviewers to generate excitement and positive word-of-mouth buzz about the book.
By publishing your picture book, you’ll share your creativity and storytelling with the world, bringing joy and inspiration to young readers everywhere. Embrace the journey of publication with enthusiasm and confidence, knowing that your hard work and dedication have led to this exciting milestone.
Looking for some additional resources on how to write a picture book? See the books below for more guidance and ideas (The links below are Amazon affiliate links):
Step 18: Celebrate
Celebrating the completion of your picture book is an essential part of the creative process. It’s a moment to acknowledge your hard work, perseverance, and accomplishments as a writer and creator. Take time to revel in your success and commemorate the journey that led to the publication of your book.
Let’s continue with our example of “Blossom Finds a Friend” and explore ways to celebrate the completion of your picture book:
- Host a Book Launch Party: Organise a book launch event to celebrate the official release of your picture book. Invite friends, family, fellow writers, and supporters to join you in commemorating this special occasion. Create a festive atmosphere with decorations, refreshments, and book-themed activities.
- Example: You host a book launch party for “Blossom Finds a Friend” at a local bookstore or community centre. You decorate the venue with colourful garden-themed decorations and provide snacks and drinks for guests to enjoy. You read excerpts from the book, sign copies for attendees, and mingle with readers to share your excitement.
- Share Your Success on Social Media: Share news of your book’s publication on social media platforms such as Facebook, Instagram, Twitter, and LinkedIn. Post photos, videos, and updates about the journey of creating your picture book, and express gratitude to everyone who supported you along the way.
- Example: You announce the release of “Blossom Finds a Friend” on your social media accounts, accompanied by eye-catching graphics and behind-the-scenes photos from the book’s creation process. You express heartfelt thanks to your followers, friends, and collaborators for their encouragement and support.
- Treat Yourself to a Reward: Treat yourself to a special reward or indulgence to mark the completion of your picture book. Whether it’s a relaxing spa day, a weekend getaway, or a favourite meal at your favourite restaurant, take time to pamper yourself and celebrate your hard-earned success.
- Example: You treat yourself to a weekend getaway to a tranquil countryside retreat, where you can unwind, recharge, and reflect on your creative journey. Surrounded by nature and serenity, you savour the moment and revel in the sense of accomplishment that comes from bringing your picture book to life.
- Reflect on Your Journey: Take time to reflect on the journey of writing and publishing your picture book. Acknowledge the challenges you faced, the lessons you learned, and the moments of joy and inspiration along the way. Celebrate not only the end result but also the growth and creativity that flourished throughout the process.
- Example: You journal about your experiences writing and publishing “Blossom Finds a Friend” capturing memories, insights, and reflections on the journey. You express gratitude for the opportunity to share your story with the world and celebrate the transformative power of storytelling.
By celebrating the completion of your picture book, you honour the effort and dedication you invested in bringing your vision to life. Embrace this moment of triumph and look forward to the exciting adventures that lie ahead as an author and creator.
Frequently Asked Questions
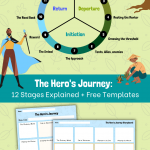
How do you structure a picture book?
While there’s no one-size-fits-all structure for picture books, several common formats offer a solid foundation for your storytelling. Here are a few popular approaches:
- Classic Three-Act Structure: This familiar format mirrors traditional narratives with a beginning, middle, and end.
- Beginning: Introduce your characters, setting, and the initial problem or challenge.
- Middle: Show your characters’ attempts to solve the problem, facing obstacles and setbacks along the way.
- End: Resolve the conflict or challenge, leaving the reader with a satisfying conclusion and takeaway.
- Problem-Solution Structure: This format focuses on a specific problem the protagonist faces and their journey to solve it.
- Introduce: Present the character, their world, and the problem they encounter.
- Attempts: Show the character’s multiple attempts to solve the problem, emphasizing their resilience and growth.
- Solution: Reveal the successful solution, showcasing the character’s learning and development.
- Journey Structure: This format follows a character’s journey through a physical or emotional landscape, facing challenges and learning valuable lessons.
- Departure: Show the character leaving their familiar setting or comfort zone.
- Challenges: Depict the obstacles and trials they face on their journey, highlighting their struggles and growth.
- Return: Showcase the character’s return, transformed by their experiences and carrying valuable lessons.
- Cumulative Structure: This format builds on repetition and anticipation, creating a sense of momentum and excitement.
- Introduce: Present the initial element or situation.
- Additions: Gradually add new elements or characters, building on the previous ones.
- Resolution: Conclude with a satisfying payoff or twist that ties everything together.
These are just starting points. Feel free to adapt, combine, or invent your own structure based on your unique story and target audience.
How do I write my first picture book?
Writing your first picture book can be an exciting and rewarding journey! Here are some steps to help you get started:
- Define Your Story Idea: Begin by brainstorming ideas for your picture book. Think about what themes or messages you want to explore, as well as the characters and setting you’d like to create.
- Develop Your Characters: Create memorable characters that will capture the imaginations of young readers. Consider their personalities, motivations, and arcs throughout the story.
- Outline Your Story: Once you have a clear idea of your characters and plot, outline the main events of your story. Determine the beginning, middle, and end, and identify key moments that will drive the narrative forward.
- Choose a Narrative Style: Decide on the narrative style that best suits your story. Picture books often use simple language and concise storytelling to engage young readers.
- Write the First Draft: Start writing your first draft, focusing on capturing the essence of your story and characters. Don’t worry too much about perfection at this stage—just get your ideas down on paper.
- Edit and Revise: Once you’ve completed your first draft, take time to revise and refine your manuscript. Pay attention to pacing, language, and clarity, and make any necessary changes to strengthen the story.
- Consider Illustrations: Picture books are a visual medium, so consider how your story will be enhanced by illustrations. You can either create your own illustrations or work with an illustrator to bring your story to life.
- Design Your Book: Think about the layout and design of your book, including the placement of text and illustrations on each page. Consider how the design will enhance the reading experience for young children.
- Seek Feedback: Once you have a polished draft of your picture book, seek feedback from trusted friends, family, or writing groups. Their input can help you identify areas for improvement and make your story even stronger.
- Finalize and Publish: After incorporating feedback and making final revisions, you’re ready to finalize your picture book and consider publishing options. Whether you choose traditional publishing or self-publishing, be sure to research your options and find the best fit for your book.
Remember, writing a picture book is a creative process, so don’t be afraid to experiment, take risks, and have fun along the way. With dedication and perseverance, you can bring your story to life and share it with young readers around the world.
How much money can you make from writing a picture book?
The amount of money you can make from writing a picture book can vary widely depending on several factors, including the success of your book, your publishing arrangement, and your marketing efforts. Here are some potential sources of income from writing a picture book:
- Advance: If you’re traditionally published, you may receive an advance payment from your publisher. This advance is typically paid out in stages, such as upon signing the contract, upon delivery of the manuscript, and upon publication. Advances can range from a few hundred to several thousand pounds, depending on factors such as your publishing track record and the perceived marketability of your book.
- Royalties: In addition to an advance, authors typically earn royalties on sales of their books. Royalty rates vary depending on your contract and the format of the book (e.g., hardcover, paperback, e-book). Traditionally published authors typically earn royalties ranging from 5% to 15% of the book’s retail price. Self-published authors may earn higher royalty rates but are responsible for all production and marketing costs.
- Additional Rights Sales: Authors may also earn income from additional rights sales, such as foreign translation rights, audio rights, and merchandising rights. These rights can be licensed to other publishers or companies for a fee or a percentage of sales.
- Public Performance Rights: Authors may earn income from public performance rights if their book is adapted into other formats, such as a stage play, puppet show, or animated film. Public performance rights allow for the public performance or display of copyrighted works and can result in licensing fees or royalties.
- Author Visits and Speaking Engagements: Authors may supplement their income by conducting author visits and speaking engagements at schools, libraries, bookstores, and literary events. These appearances can generate additional income through honorariums, book sales, and merchandise sales.
- Merchandise Sales: Authors may also earn income from the sale of merchandise related to their book, such as T-shirts, posters, bookmarks, and other branded items. These sales can be conducted online or through book signings and events.
It’s important to note that while some picture book authors achieve significant financial success, many authors earn modest incomes from their writing. Success in the publishing industry often requires a combination of talent, persistence, and luck, as well as a willingness to adapt to changes in the market and industry trends. Additionally, income from writing can vary from year to year based on factors such as book sales, advances, and additional rights sales.
Is it hard to write a picture book?
Writing a picture book can present its own set of challenges, but whether it’s “hard” can depend on various factors, including your familiarity with the genre, your writing experience, and your ability to craft a compelling story within the constraints of the format. Here are some factors to consider:
- Simplicity: Picture books are typically short, with limited word counts, so you must convey your story concisely and effectively. This can be challenging as you need to convey complex themes or ideas in a simple and accessible way.
- Visual Narrative: Picture books are a collaboration between words and illustrations, so you need to leave room for the illustrations to complement and enhance the text. Balancing text and visuals can be challenging, especially if you’re not an illustrator yourself.
- Audience Considerations: Picture books are primarily written for young children, so you need to understand your target audience and craft a story that engages and entertains them. This might require thinking about themes, language, and story structure from a child’s perspective.
- Story Structure: Even though picture books are short, they still require a well-developed plot, engaging characters, and a satisfying resolution. Crafting a compelling story within a limited space can be challenging and may require careful planning and revision.
- Market Competition: The market for picture books is highly competitive, with many talented authors vying for limited shelf space. Standing out in the crowded market can be challenging, especially for new and aspiring authors.
That being said, many writers find writing picture books to be a rewarding and fulfilling experience. Picture books have the power to inspire, educate, and entertain young readers, and seeing your book come to life can be incredibly gratifying. With dedication, perseverance, and a willingness to learn and grow as a writer, you can overcome the challenges and write a picture book that captivates readers of all ages.
Summary
Embarking on the journey of writing a picture book is an adventure filled with creativity, imagination, and endless possibilities. Whether you’re a seasoned author or a novice storyteller, the process of bringing your vision to life on the pages of a picture book is both challenging and immensely rewarding. By following the steps outlined in this guide, you’ll be well-equipped to embark on your own picture book journey and create stories that captivate and inspire young readers.
And that wraps up our 18-step guide to writing your first picture book! I hope these tips help you bring your imaginative story to life for young readers. Let me know in the comments if you have any other questions on how to write a picture book – I’d love to hear from you!


Comments loading...